Monday, February 15, 2010

Valentine's Day Dinner

This year, Liz and I decided to stay in and cook a meal together rather than going out, to save money for our trip to Amy and Jeremy’s wedding in June (in Hawaii!). We did dinner and dessert, and although neither turned out exactly like they were supposed to, it was a lot of fun!

Dinner:
We decided on a recipe for Cajun Seafood Pasta, which we modified a little. It got rave reviews on the internet and it sounded fairly easy. It really was, we’ll definitely be making it again! The recipe is here, and the only modifications we made are as follows:

  • Instead of fresh basil and thyme we used dried, so we cut down the quantities by about half
  • Same deal with the red pepper flakes, to make it less spicy for Liz
  • Instead of scallops we used crab (imitation, don’t judge our wallets)
  • Although the recipe calls for a delicious amount of cheese, we accidentally skipped this step and didn’t realize we forgot the cheese until we’d finished eating… Oops!


The finished dish came out like this:


Although we both liked it, (I loved it, but then again I’m really not a picky eater) Liz kept saying that it needed something, that it was missing something. When we went to put our dishes away and spotted the shredded cheese just waiting to be added to a dish that had forgotten it, this made a lot of sense. Although this mistake inadvertently made the dish a lot healthier, (that heavy whipping cream has a LOT of calories, and the cheese would only have added to that) we definitely will be trying it again sometime with the cheeses.

Dessert:
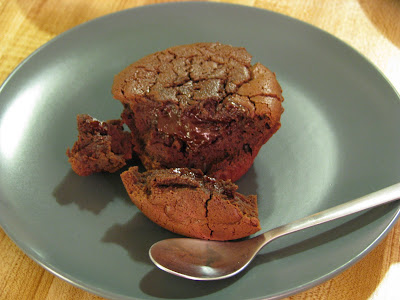
Our dessert was Chocolate Lava Cakes, and they were pretty easy! The recipe is here, and we didn’t change it, except that I added an ounce more chocolate than it called for. I used two 3.5oz Ghirardelli Twilight Delight bars that I happened to have in the cupboard - 72% cacao. Yum! I also didn’t use a double-boiler, just a metal mixing bowl on the stove and constant stirring with a whisk. Since I don’t have ramekins, we used large tinfoil cupcake liners on a cookie sheet. The recipe made 6 of these, since they hold less batter than the ramekins. Of course, I overcooked these slightly (we could blame me, but I’ll just blame my oven, so what’s the point?) so they weren’t quite as lava-like as promised. They were still very good though! Deliciously moist. We saved two to bake later, and these are refrigerated at the moment so hopefully we’ll get a better lava experience out of these whenever we bake them. I’ll keep you all informed. Our results from the first “batch” are pictured below:
Friday, February 12, 2010

Friday, February 5, 2010

Crab Rangoons FTW!

I don’t want to ruin Chinese take-out for anyone, but I’m about to let you in on a little secret. This is a secret that will not ruin, but in fact enhance, your take-out experience. Whenever I get Chinese food, I like to get crab rangoons (or crab cheese, whatever you like to call them). Although they’re delicious, there are never really enough of them, and I always find myself craving more.

So what the heck is this secret? They’re really easy to make yourself!

You’ll need:

* 2-3 sticks of imitation crab meat
* 1 block of cream cheese
* Worcestershire sauce (just a dash)
* Soy sauce (just a dash)
* Garlic (minced, about a teaspoon)
* Onion powder (again, just a dash)
* Wonton wrappers
* Oil for frying

First, chop the crab into tiny pieces (this used to take me forever until I bought a SlapChop!). Mix the minced crabmeat with the cream cheese, Worcestershire and soy sauces, garlic, and onion powder. This works best if the cream cheese is warmed slightly. You’ll get something like this:


The next part is the tricky part, but once you master it, it becomes second nature. First, simply place a small spoonful of the mixture onto each wonton wrapper. The following is a good amount, but you might want to start with a little less to make it easier until you get the trick of sealing the wontons:


To seal, wet the edges of the wrapper with water using your finger, and then pick up the whole wrapper. Make the corners meet at the top and when all the other edges of the wrapper align with their neighbors, press them together firmly to seal. Make sure you do this well and there are no gaps, because you don’t want the crab mixture escaping into your oil! When you finish, the wontons may or may not look something like this:


The process of frying the wonton wrappers and crab mixture to get the crispy fried goodness known as crab rangoons is fairly simple, and is made easier if you have a deep fryer! Although this device is very convenient and is great for frying a variety of fun foods, it does tend to make small poorly ventilated apartments smell strongly of McDonald’s - opening a window or two is advised. I heat my oil to about 325 degrees and fry for about 2-3 minutes, when they turn a light golden brown.


The end result is pictured below. I like to eat them with the “Duck Sauce” packets that the China City by my apartment puts in with their take-out - very similar in taste to sweet and sour sauce. I tend to make these whenever Liz and I, or my friends and I, get Chinese take-out. They not only make the bill a little cheaper, but they make the experience a lot more fun!

Friday, January 29, 2010

Delicious Buttercream Brownie Pie

Here begins the saga of the Brownie Pie.

I say saga because this truly is an epic dessert. Yet it was REALLY easy to make. All you do is fill a chocolate pie crust with a rich brownie mix (I used a fudge brownie mix and would definitely recommend it) and then top it with the slightly more complicated cocoa buttercream frosting.

I can count the number of times I’ve made frosting myself on one hand - in fact I think I could still do this if I was missing several fingers - so I have very little to compare this buttercream recipe to as far as effort required. It seemed pretty easy to me though, as it only took about 10 minutes from start to finish.

The site that I found this cake on - CakeSpy - lists recipes for the brownies as well as the frosting. I just used a box of brownie mix though, and focused my efforts on the frosting. The brownie recipe looked a little complicated and in my opinion the boxes taste just fine. Would it have been better if I had made it homemade? Probably. Would I still have been able to pull it off? Possibly not. What I’m posting here is what I did, but you can link through to the CakeSpy site if you’re more ambitious than I. If so, I give you credit. *pats you on back*

You’ll need:

* 1 pie crust (chocolate)
* 1 brownie mix - prepared like the box says (fudge is goood!)
* 1 cup butter
* 4 tablespoons cocoa
* 2-3 tablespoons milk
* 1 teaspoon vanilla
* 2-3 cups confectioner’s sugar (I only used two)

The instructions for the pie are simple - just prepare the brownie mix as directed on the box - mine wanted oil and eggs and a splash of water - and then pour it in the pie crust, until it’s about 2/3 full. You’ll have batter leftover, so go to town on that. When you’re done shamefully eating at least a little of the batter, pop it in the oven (which should be preheated to 350 degrees, did I mention that? You should have seen it coming). Although the recipe says to cook it for about 30 minutes, mine took around 40. This may be because I have a slightly wonky oven, so you can probably stick to around 30 minutes. You want the brownie to be mostly cooked, but still slightly gooey. When it’s done, take it out and let it cool.

Now you’re ready to make the frosting! Aren’t you excited? Good.

Start by creaming the butter in a mixing bowl. When it’s smooth, add the cocoa and mix well, and then add the vanilla and milk and mix until it is all incorporated. Just in case you were wondering, if at this point you happened to accidentally get some of what you just mixed on your hand and licked it off, it would not taste delicious yet. In fact it would taste very bad. To make it delicious, add the powdered sugar until the frosting reaches the consistency you’d like. I used two cups.

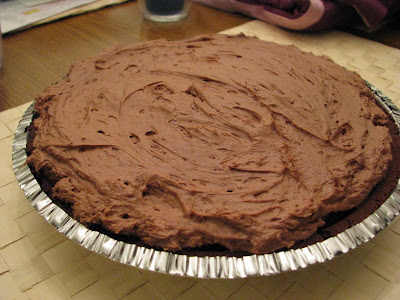
Once the pie is cooled you can carefully spread the frosting on top, trying not to get brownie bits into the frosting. I did this awesomely, if I do say so myself. Hopefully you’ll get something that looks as good as, but not better than, this:


Enjoy!